Thursday, November 30, 2006

Homemade Handprint Gift Tags

Today's Craft: Homemade Handprint Gift Tags
The perfect additional to any gift you are giving this holiday season.
To make these gift tages, either trace your hand on a piece of colorful paper and cut it out, or press your hand in fingerpaint and then onto a piece of paper and let dry. Next add the name of the person to whom you are giving the gift, your name, and than decorate further with your crayons, markers, glitter, etc. Happy Holidays! Enjoy Crafting!

Wednesday, November 29, 2006

Holiday Handprint Wreath

Today's Craft: Holiday Handprint Wreath
To make this holiday wreath you will need green construction paper, glue, red ribbon and construction paper, and a paper plate. Trace your handprints many times on green construction paper and cut them out. Take the paper plate and cut out the center to create a basic wreath shape. Arrange the handprints in a circle with the fingers pointing outwards on the ring you just created and glue them in place. Take the red ribbon or use red construction paper to make a bow and glue onto the top or bottom of your wreath. Now decorate your wreath more if you wish- paint it, add glitter, or other shapes, wire garland, and more. Enjoy Crafting!

Tuesday, November 28, 2006

Gingerbread Houses

Today's Craft: Gingerbread Houses
Create a giant gingerbread house that would make Hansel & Gretel proud!
To make this craft project you will a large cardboard box, colored construction paper, scissors, glue, tape, cotton balls, and markers or crayons. To begin, take your box and wrap it in brown construction paper. Next take more brown construction paper, roll each piece into a long paper tube, and then stack these paper rolls, securing them together with glue or tape, creating a pyramid shaped roof on top of your box. Now you have a basic gingerbread house shape to decorate. Now take your construction paper and cut out a wide variety of shapes- rectangles, squares, triangles, circles, and more. Glue your shapes onto the house to create windows, a door, candy trimming and decoration, etc. Add cotton balls for further decoration with glue. Let dry. Enjoy Crafting!

Monday, November 27, 2006

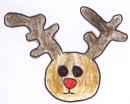
Easy and Adorable Reindeer

Today's Craft: Easy and Adorable Reindeer
Santa must be missing a Reindeer...
To make this craft project you will need brown and red construction paper, a brown paper plate, glue, crayons or markers, and scissors. To begin, cut out reindeer antlers and a red reindeer nose using the templates provided below. Glue the antlers and nose onto your brown paper plate to create an adorable reindeer face. Decorate further with your crayons or markers. Let dry. Enjoy crafting!

Sunday, November 26, 2006

Reindeer Handprint Puppet

Today's Craft: Reindeer Handprint Puppet
Make a great reindeer with a personal touch!
To make this great reindeer craft you will need a small brown paper bag, some brown construction paper,tape or glue, a red circle (cut from red construction paper or just use a red pom pom) and some crayons.First trace both of your hands on the brown construction paper and cut them out. Your handprints willbe your antlers. Create your reindeer's face on the bag's bottom, add the antlers and tail to the back side of the bag and the legs with hooves to the front. Decorate your reindeer further with spots, paper shreds, and crayons. Enjoy Crafting!

Saturday, November 25, 2006

Tiny Snowman Button Ornament

Today's Craft: Tiny Snowman Button Ornament
Transform three white buttons and some felt into a cute ornament.
To make this craft project you will need colored felt, three white round buttons, tacky glue, scissors, and ribbon. To begin cut a strip of felt to assemble your snowman on - square or point the ends of the felt. Poke a hole in the center of one of the ends and thread a piece of ribbon through to create a loop to hang your ornament from later. Next take your three white buttons and glue them in a straight vertical line in the center of your felt strip to make a snowman. Now if you want to decorate your snowman further, cut out a black felt hat, add a face with black marker, etc. Enjoy Crafting!

Friday, November 24, 2006

Christmas Paper Cone Tree

Today's Craft: Christmas Paper Cone Tree
Create a festive Christmas tree from a simple paper cone.
To make this craft project you will need tape, glue, scissors, green construction paper, glitter, colored paper, markers or crayons and a couple of pipecleaners. To begin, take your piece of green construction paper, bend it into a paper cone, tape it so it will hold its form, and then trim the bottom with your scissors so the tree will rest flat. Now you are ready to decorate your tree. Wrap pipecleaners around the cone for tinsel or lights. Add tiny paper ornament, stickers, and glitter with glue to brighten up your tree. Let dry and place someplace special. Merry Christmas. Enjoy Crafting!

Thursday, November 23, 2006

Racing Reindeer Puppet

Today's Craft: Racing Reindeer Puppet
To make this craft project you will need a paper bag, colored construction paper- black, brown, and red-, glue, scissors, and crayons or markers. To begin, using the templates cut out the reindeer face, eyes, antlers, and bright red nose from your colored construction paper. Now you are ready to assemble your reindeer puppet. Take your paper bag and flip it over so the bottom of the bag is facing up. This will be the face of your reindeer. Glue on the face, eyes, antlers and bright red nose. Let the pieces dry and then decorate your reindeer further with crayons and markers. Now you should have a beautiful paper bag puppet! Enjoy Crafting!

Wednesday, November 22, 2006

J is for JOY Christmas Banner

To make a J is for JOY Christmas Banner, you will need colored construction paper, scissors, glue, and crayons or markers. To begin, cut out the letters from whatever color of construction paper you wish. Now choose a background set of papers for your letters and glue them to the papers to create a banner. Let dry and decorate the letters and the banner with your markers of crayons. Merry Christmas! Enjoy Crafting!
More Christmas Crafts & Resources

Tuesday, November 21, 2006

Simple Pompom Christmas Tree

Today's Craft: Simple Pompom Christmas Tree
To make this craft project you will need a bunch of colored pompoms, glue, and some colored construction paper. To begin, select a piece of colored construction paper on which to make your Christmas tree. Next glue pompoms on it in the shape of a Christmas tree- use the picture as a guide. Use green ones for the tree, colored ones for the ornaments, and yellow ones to create a star. Let dry. Enjoy Crafting!
Monday, November 20, 2006

Christmas Elf Paper Bag Puppet


Today's Craft: Christmas Elf Paper Bag Puppet
To make this craft project you will need a paper bag, colored construction paper, scissors, glue or tape, and crayons or markers. To begin, using the craft templates cut out your elf's features, collar, and hat from your colored construction paper. Now flip your paper bag over so the bottom of the bag is facing up- this will become your elf's face. Next glue or tape your elf's features, hat, and collar to the paper bag and add further decoations with your crayons. Let your elf dry and you will have a great puppet. Enjoy Crafting!

Sunday, November 19, 2006

Rolie Polie Turkey

Today's Craft: Rolie Polie Turkey
Make a Rolie Polie Turkey for lots of Thanksgiving fun!
To make this Rolie Polie Turkey you will need colorful construction paper, scissors, glue, and some tape. Take your brown paper and create as 2 paper rolls. Trim the rolls so they are different lengths and then stack them one on top of the other from larger to smaller (securing them in place with tape) to build your turkey's body. Next, using the templates provided, cut out turkey features and many colorful turkey feathers. Glue these onto your turkey's body and let dry. Happy Thanksgiving! Enjoy Crafting!

Saturday, November 18, 2006

Delightful Dangling Dreidel Mobile


Today's Craft: Delightful Dangling Dreidel Mobile
Create a delightful dangling dreidel mobile using a heavy weight blue paper and ribbon.
To make this craft project you will need a couple of sheets of heavier weight blue paper, scissors, glue, a hole puncher, ribbon, crayons or markers, and glitter. To begin, using the templates provided below, cut out a large dreidel frame and four small dreidels from your heavier weight blue paper. Next take your hole puncher and punch four holes across the top of the large dreidel frame and one hole in the top of each of the dreidels. Next decorate your dreidels using your markers or crayons, and glue and glue. Let dry. Next cut out four small lengths of ribbon- attach one end to the top of the small dreidel and the other end to the dreidel frame- use the picture as a guide. Repeat until all four small dreidels are dangling within the larger dreidel. Now cut a long piece of ribbon and attach it to the top of the large dreidel frame so you can hang it up someplace special. Happy Hanukkah! Enjoy Crafting!

Friday, November 17, 2006

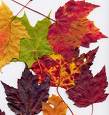
Festive Fall Leaf Turkey

Today's Craft: Festive Fall Leaf Turkey
To make this craft project you will need, colored construction paper, a number of colorful fall leaves from outside, scissors, glue, and markers or crayons. To begin cut out a turkey body and features using the template provided below- you do not need to cut out feathers. Glue the turkey body and features to a background piece of paper. Now add colorful fall leaves with glue around your turkey's body to create turkey feathers! Let dry. Happy Thanksgiving! Enjoy Crafting!

Thursday, November 16, 2006

Fall Trees Filled with Gratitude

Today's Craft: Fall Trees Filled with Gratitude
To make this craft project you will need colored construction paper, scissors, glue, and markers or crayons. To begin, cut out a brown tree trunk from your colored construction paper using the templates provided below. Glue it on a colorful background piece of paper. Next cut out a lot of and leaves in different colors. On each leaf write something for which you are grateful and add it to the tree. Decorate further with your markers or crayons if you wish. Happy Thanksgiving! Enjoy Crafting!

Wednesday, November 15, 2006

Native American War Bonnets

Today's Craft: Native American War Bonnets
To make this craft project you will need some heavier weight colored construction paper, scissors, glue, paint, markers, or crayons, and tape. To begin cut out a long headband from your paper, fit it to the size of your head and tape it securely together so it holds its shape. Next cut out a large number of feathers using the templates provided below. Make them 'feathery' looking by cutting a number of diagonal slits around the edges of each. Decorate them using your paint, markers, or crayons. When you are finished attach them to your headband all the way around it. Decorate further if you wish. Enjoy Crafting!

Tuesday, November 14, 2006

Wampum

Today's Craft: Wampum
To make this craft project you will need string, scissors, and different colored soda straws. To begin, take the diffrent colored straws and cut them into one inch pieces. Next cut a long piece of string that will easily fit over your head. Cut several pieces of string this length if you want to make multiple wampum necklaces. Now thread the pieces of straw onto the length of string and when you are finished threading it tie the two ends of the string together and you will have a wonderful wampum necklace.
Native American Crafts & Resources

Monday, November 13, 2006

Thanksgiving Gratitude Turkey

Today's Craft: Thanksgiving Gratitude Turkey
To make this craft project you will need colored construction paper, scissors, glue, and markers or crayons. To begin, cut out a brown turkey body shape and turkey features using the templates below from your colored construction paper. Glue them on a colorful background piece of paper. Next cut out a lot of turkey feathers in different colors. On each feather write something for which you are grateful and add it to the turkey. Decorate further with your markers or crayons if you wish. Happy Thanksgiving! Enjoy Crafting!

Sunday, November 12, 2006

Painted Buffalo Skins

Today's Craft: Painted Buffalo Skins
To make this craft project you will need large brown paper bags (grocery size), scissors, and markers, crayons, or paints. To begin take your grocery bags and cut it open so it is large and flat. With your scissors trim the edges so it has the shape of an animal skin. Next decorate it with your markers, crayons, or paints- you decide. If you want use some of the symbols provided in the template below. Let dry. Enjoy Crafting!

Friday, November 10, 2006

Native American Moccasins

Today's Craft: Native American Moccasins
Make a pair of cool Native American Moccasins.
To make this craft project you will need 2 large pieces of thick brown felt, scissors, thick thread and a needle, colored felt, tacky glue, and fabric markers. To begin, fold a large piece of felt in half. Put your left foot on it about 1/2 inch from the fold and one inch from the bottom of the felt. Now trace around the left side and top of your foot- now add about one inch extra all around the tracing. Leave the right side straight- don't trace the right side of your foot. Now take your scissors and cut out your moccasin. Take your needle and thread and so up the top and left side of the moccasin. Cut a slit shaped like a T down the center of the top - (about 2/3 of the length of the top)- of the moccasin. Now stitch together the heel, make a small cut near the bottom to create a flap to sew it all together. Now decorate your moccasins with colorful pieces of felt and fabric makers. Enjoy Crafting!

Thursday, November 09, 2006

Colorful Handprint Corn

Today's Craft: Colorful Handprint Corn
To make this craft you will need yellow, blue, and green construction paper, crayons, and glue. Place your hand on the yellow, keep your fingers together and trace your hand. Cut out your handprint and glue it onto a piece of blue paper. Next cut out corn husk pieces from the green paper and add them to your picture. Add corn kernels with crayon all over the entire hand print, or add pre-cut yellow corn kernel shapes with glue.

Wednesday, November 08, 2006

Terrific Turkeys for Your Table

Today's Craft: Terrific Turkeys for Your Table
A easy and fun way to decorate your Thanksgiving table!
To make this project you will need a pinecone for each person at the table, pipecleaners of all colors, scissors, and mailing labels. First clean the pine cones and then take the pipe cleaners and cut them in half. Make a loop and twist the ends of the pipe cleaners to make feathers for your turkey. Use all different colors. Insert them into the pine cone turkey. Twist a brown or black pipecleaner for the head and neck and secure it in the front of the pine cone. Next take a mailing label and write the name of a guest on it. Now take a pipe cleaner and stick the label you wrote the name on to another mailing label keeping the pipe cleaner in between. Place the guest's name on the turkey. Place around the table when you are ready and you will have some fun table decorations for your feast!

Tuesday, November 07, 2006

Fabulous Fingerprint Turkey

Today's Craft: Fabulous Fingerprint Turkey
Create a Fabulous Fingerprint Turkey for Thanksgiving.
To make this craft project you will need, colored construction paper, your fingers, either a washble ink stamp pad or fingerpaints, scissors, glue, and markers or crayons. To begin cut out a turkey body and features using the template provided below- you do not need to cut out feathers. Glue the turkey body and features to a background piece of paper- use the picture as a guide. Now add colorful turkey feathers using your fingerprints! Let dry. Happy Thanksgiving! Enjoy Crafting!

Monday, November 06, 2006

Sailing Mayflower

Today's Craft: Sailing Mayflower
Cut out a boat and sails using the templates provided. Select a blue background piece of paper, and gather up a few craft stick to use as a mast. Cut an anchor out of paper using the template provided and attach it to a small piece of string or ribbon to add to your boat. Paste or tape down your boat, mast, sails, and anchor to the blue paper creating a Mayflower. Add in waves, seagulls, pilgrim figures if you want. To make simple pilgrims, tape or glue black hats onto small craft sticks, add faces to them, and slip them inside the boat. Enjoy Crafting!

Sunday, November 05, 2006

American Indian Peace Pipe

Today's Craft: American Indian Peace Pipe
To create this craft project you will need a dixie cup, two craft sticks, a pipe cleaner, colored construction paper, colorful ribbon, scissors, feathers, crayons, tape, and glue. To begin take the two craft sticks and tape them together end to end to create the stem of your American Indian Peace pipe. Select colored craft sticks to make a more colorful craft. Next cut a slit just above the bottom rim of the dixie cup on one side of the cup. Insert the long craft stick you just made through the hole and tape in place. Now you have a basic Peace Pipe! Cover the dixie cup with colored tissue paper or simply color it with crayons and markers. Now decorate your American IndianPeace Pipe! Twist a colorful pipe cleaner up the stem of the pipe, feathers, add colors with crayon and markers, and more. Take some feathers and attach them to a ribbon and tie that to the pipe so it dangles from it. Enjoy Crafting!

Saturday, November 04, 2006

Paper Plate Pilgrim Boy

Today's Craft: Paper Plate Pilgrim Boy
Make a neat pilgrim boy just in time for Thanksgiving.
To make this craft project you will need a paper plate, colored construction paper, scissors, glue, and markers or crayons. To begin, using the template below cut out a black pilgrim hat and buckle for the hat from your colored construction paper. Next cut some strip of paper to create hair for your pilgrim. Now you are ready to assemble your project. First glue the paper strips onto the paper plate around the top and side edges to create hair for your pilgrim. Then glue on the hat and glue the buckle onto the hat. Let dry and create a face on the paper plate using your crayons or markers. Happy Thanksgiving. Enjoy Crafting!

Friday, November 03, 2006

Terrific Thanksgiving Turkey Wreath

Today's Craft: Terrific Thanksgiving Turkey Wreath
To make this craft project you will need colored construction paper, scissors, glue, a paper plate, and crayons or markers. To begin, using the turkey template provided below, cut out a turkey body, features, and lots of feathers from your colored construction paper. Next take your paper plate and cut out the middle so you are left with a large wreath shape. Now glue your turkey body, features, and feathers onto the paper ring- use the picture as a guide. Let dry and decorate further with your markers or crayons. Happy Thanksgiving! Enjoy Crafting!
Thursday, November 02, 2006

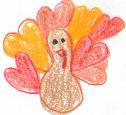
Heartwarming Turkey

Today's Craft: Heartwarming Turkey
Create a turkey which will warm your heart this Thanksgiving
To make this craft project you will need colored construction paper, scissors, glue, and crayons or markers. To begin, using the templates provided below, cut out a turkey body, turkey features, and many colorful hearts from your colored construction paper. Glue them together using the picture as a guide to create a heartwarming turkey. Let dry and decorate further with crayons or markers if you wish. Enjoy Crafting!

Wednesday, November 01, 2006

Paper Plate Scarecrow Face

Today's Craft: Paper Plate Scarecrow Face
To make this craft project you will need a paper plate, straw or raffia, glue, scissors, and colored construction paper. To begin, take your scissors and cut out some circles for eyes, a triangle nose, and some curvy lines for eyebrows and a smile from your colored construction paper. Next take your glue and cover your paper plate with it. Add straw or raffia on top of the glue, covering the plate. Now add your scarecrow's facial features. Let dry. Enjoy Crafting!